
You just had a new garage door installed, and everything looks great. But when you look closely along the edges, you notice a thin strip of daylight. Is that normal, or did the installer miss something? A properly fitted garage door side seal helps close the space between your door and its frame. Without it, autumn winds can carry dust, leaves, and cooler air into your garage. For homeowners in Valley Village, CA, these small gaps can become especially noticeable during November’s breezy evenings.
Fortunately, you do not need special tools to spot most fitting problems. A few careful visual checks can help you understand whether the weatherstripping makes proper contact.
Here is what to look for during your new garage door installation and when to ask your installer for an adjustment.
What Does a Properly Fitted Garage Door Side Seal Look Like?
A garage door side seal usually consists of a rigid strip attached to the exterior door frame and a flexible flap that rests against the closed garage door.
Installers often call this combination garage door stop molding. The flexible section creates contact between the garage door frame seal and the door’s outer surface.
A properly fitted seal should:
- Touch the closed door along its full height.
- Bend slightly without folding tightly against the panels.
- Cover visible gaps between the door and frame.
- Stay securely attached to the frame.
- Allow the door to open without catching or dragging.
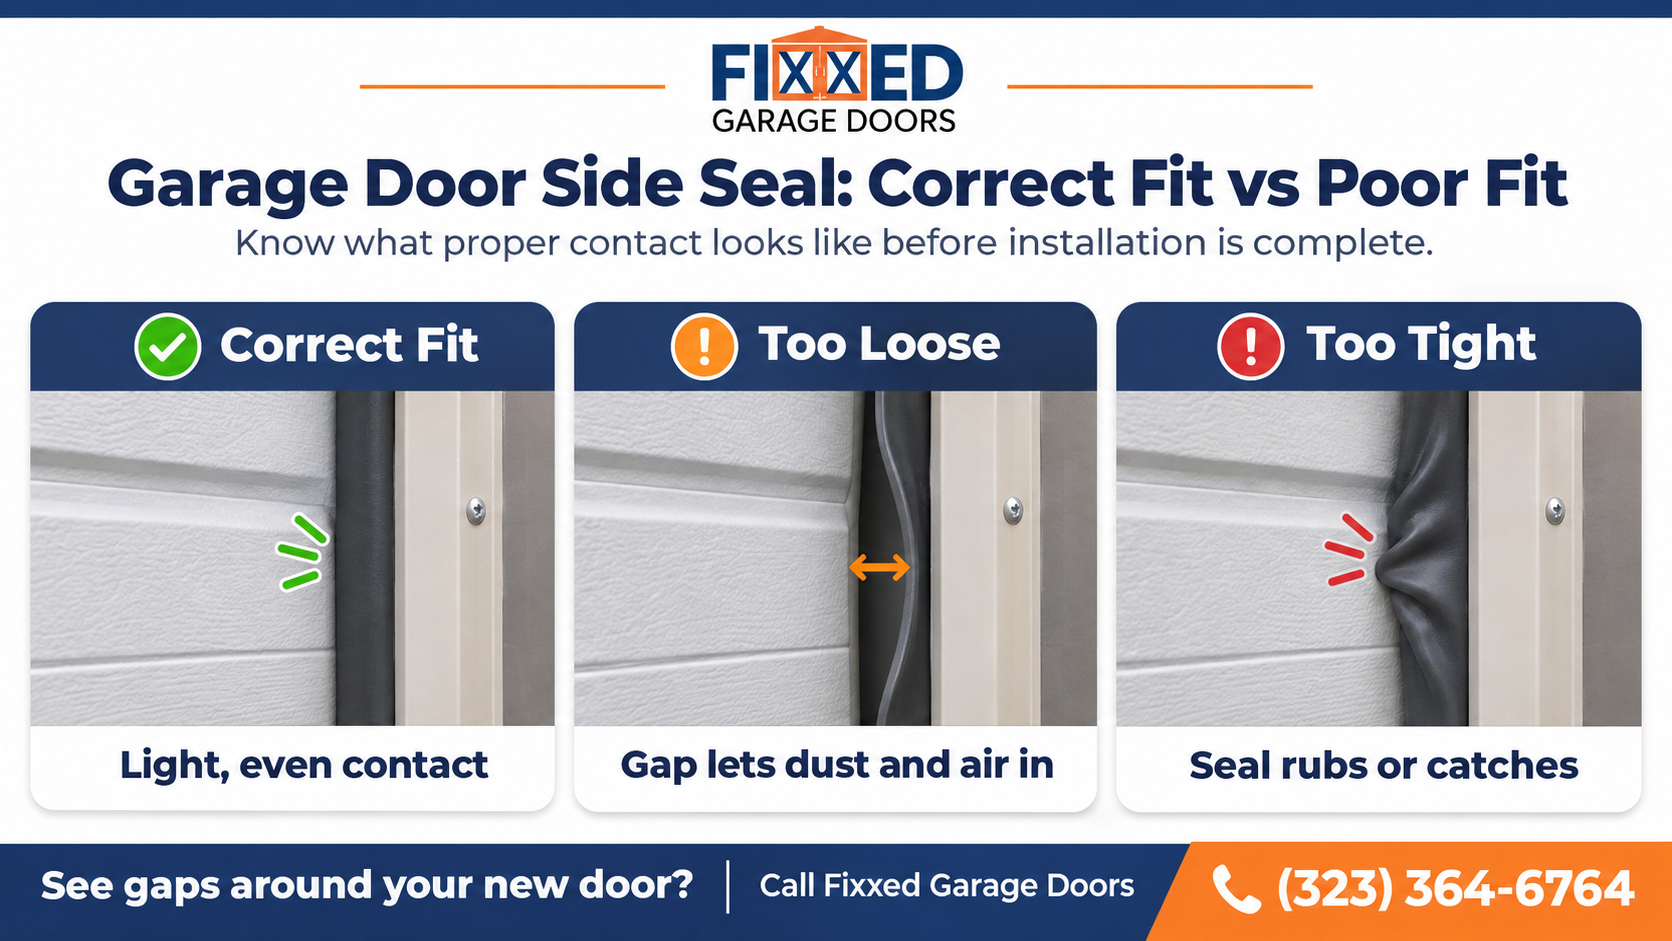
The goal is gentle, consistent contact. If the installer positions the seal too far from the door, gaps may remain. However, placing it too close can create friction during operation.
So, how can you check that balance? Start with the seal’s position.
Step 1: Check the Garage Door Side Seal Position
The first thing to inspect is where the installer placed the weatherstripping. Stand outside your garage while the door remains fully closed. Look at the vertical strips running along both sides of the opening.
The rigid molding should sit securely against the frame, while the flexible flap should extend toward the garage door. You should see the flap resting lightly against the outer face of the door.
Look for these details:
- Straight positioning: The molding should follow the frame without noticeable bends or uneven sections.
- Consistent contact: The flexible flap should touch the door from top to bottom.
- No excessive bending: The seal should not fold sharply or bunch against the panels.
- Secure attachment: The molding should not hang loose or pull away from the frame.
A small amount of flexibility is normal. In fact, the seal needs that movement to maintain contact as the door settles into its closed position.
If one section touches the door while another leaves a gap, ask your installer to check the positioning before finishing the job.
Step 2: Look for Garage Door Air Gaps Around the Frame
Next, check for visible openings. Close the garage door and stand inside during daylight. Turn off the garage lights if you can still see your surroundings safely.
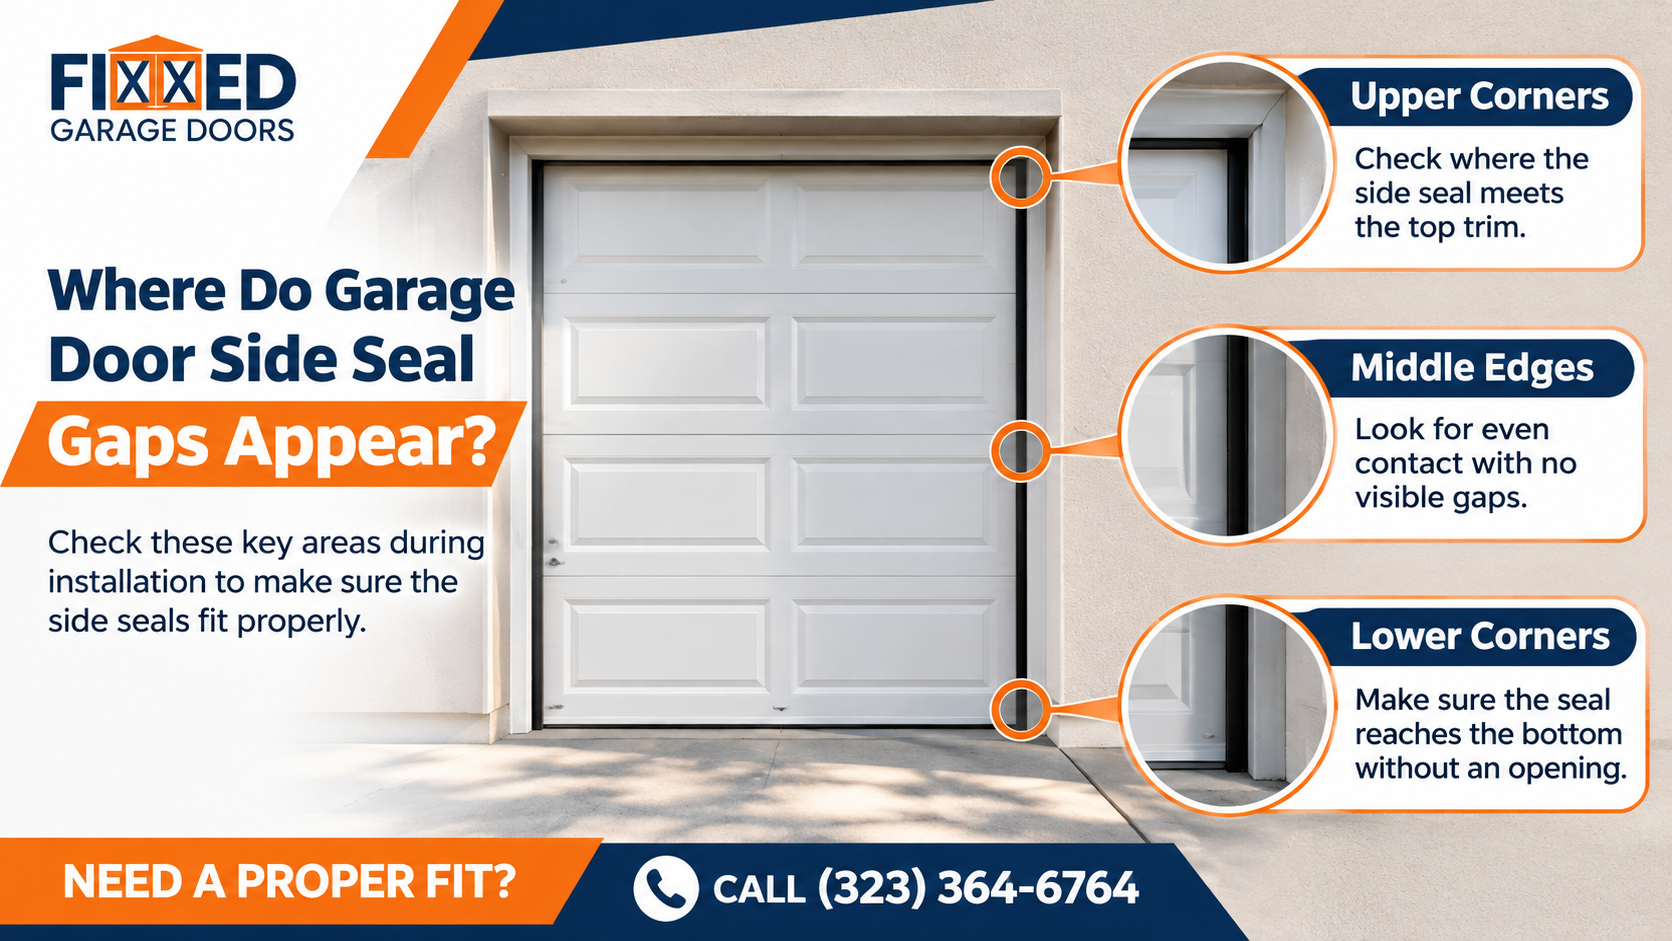
Look toward the vertical edges where the door meets the frame. Do you notice narrow lines of daylight? A properly positioned garage door side weatherstripping system should cover the intended openings along both sides of the door. Pay attention to three areas:
1. Upper Side Corners
The upper corners deserve a closer look because the side weatherstripping meets the trim near the top of the opening. If the pieces do not meet properly, you may notice a small opening where dust and air can enter.
Ask the installer to check how the corner pieces meet rather than adding unnecessary pressure to the side seal.
2. Middle of the Door Frame
Look along the center of each vertical edge. The flexible flap should maintain contact across the garage door panels without lifting away from the surface.
If you see an uneven line of daylight, the frame may need a closer assessment.
3. Lower Side Corners
Finally, inspect the lower ends of the side weatherstripping. The side pieces should reach their intended finishing position without curling away or leaving an obvious opening along the frame.
These checks can help you identify gaps before the installer completes the work.
Step 3: Make Sure the Side Seal Is Not Too Tight
A good garage door perimeter seal should help block unwanted airflow without interfering with normal movement. You might assume that pressing the rubber flap harder against the door creates a better seal. However, excessive pressure can cause problems.
When the weatherstripping sits too close, the door may rub against it as it opens or closes. Common warning signs include:
- The flexible flap folds backward.
- The rubber catches on panel edges.
- The seal makes a scraping sound.
- The flap pulls away from its molding.
- The door visibly drags against the weatherstripping.
If you notice these signs, do not try to force the door through the tight section. Instead, point out the problem to your installer. They can adjust the molding’s position while maintaining appropriate contact. The right fit should feel snug, not forced.
Step 4: Compare Both Sides of the Garage Door
Are the left and right side seals supposed to look identical? Not always. Garage door frames can have slight differences, especially in older homes. What matters is whether both seals provide consistent contact with the door.
For example, a home near Valley Village Park may have an older garage opening with trim that is not perfectly straight. A newer property closer to Studio City might have a more uniform frame.
In either case, the installer should account for the actual opening rather than assuming both sides need exactly the same positioning.
Use this quick comparison when checking your new installation:
| What to Check | Proper Fit | Needs Attention |
|---|---|---|
| Seal contact | Flap touches the door evenly | Visible gaps along the edge |
| Seal position | Molding follows the frame | Uneven or loose sections |
| Flexibility | Flap bends slightly | Flap folds or bunches |
| Door clearance | Door moves without catching | Seal rubs or snags |
| Frame corners | Trim meets cleanly | Noticeable openings |
A difference in appearance does not automatically mean something is wrong. However, a visible gap or dragging seal deserves attention.
Step 5: Ask Your Installer to Confirm the Weatherstripping Fit
Once you finish your visual checks, discuss anything unusual with your installer. You do not need to adjust the frame, loosen screws, or move the weatherstripping yourself during a new installation.
Instead, ask a few practical questions:
- Does the side seal make contact along the full height of the door? Ask the installer to point out the sealing surface.
- Is the flexible flap pressing too tightly? The seal should not interfere with door movement.
- Are the corners properly fitted? Make sure the side trim meets the surrounding frame components as intended.
- Can you correct any visible gaps before completing the installation? Addressing them now avoids unnecessary follow-up work.
- Does the weatherstripping match the new door’s design? Different panel shapes and frame conditions can affect positioning.
These questions make it easier to understand what the installer has completed and whether the seal needs adjustment.
What Causes Garage Door Side Seal Gaps After Installation?
Sometimes, a side seal appears properly installed at first but leaves visible openings once the door closes.
Several issues can explain this.
- Uneven door framing: Older wood trim may have small bends or irregular surfaces that make consistent contact harder.
- Incorrect molding position: If the installer places the molding too far from the door, the flexible flap may not reach the panel surface.
- Poorly fitted corners: Small openings can appear where separate pieces of weatherstripping meet.
- Incompatible seal design: The flexible flap may not suit the door’s panel shape or available frame clearance.
- Loose attachment: If the molding shifts away from the frame, the seal may lose contact.
These issues do not always require major garage door repair. In many cases, a professional can correct the weatherstripping position or replace an unsuitable piece.
However, if the gap comes from the frame itself, the installer needs to assess the underlying condition rather than simply pressing the seal harder against the door.
How Does Side Weatherstripping Differ From the Bottom Seal?
Although both components help protect your garage, they serve different parts of the opening.
A garage door side seal closes the vertical gaps between the door and its frame. The bottom seal creates contact between the lower edge of the door and the garage floor. Each component needs the correct fit for its location.
We covered bottom seal profiles, retainer compatibility, and garage floor measurements in our previous guide, Garage Door Bottom Seal: How to Choose the Right Fit.
For this installation, focus on whether the side weatherstripping makes consistent contact with the door without restricting movement.
Garage Door Side Seal FAQs
Should a garage door side seal touch the door?
Yes. The flexible flap should lightly touch the outside surface of the closed door. It should create consistent contact without excessive bending or pressure.
Can garage door side seals be adjusted after installation?
Usually, yes. Depending on the molding and frame condition, a technician may reposition or replace the weatherstripping to improve contact.
Is a small amount of daylight around the garage door normal?
A visible opening along the intended sealing surface may indicate poor contact. Have your installer inspect the gap rather than assuming it is normal.
How long should garage door side weatherstripping last?
Its lifespan depends on material quality, sun exposure, weather conditions, and regular use. Periodically check for cracking, hardening, or sections pulling away from the frame.
Can I install new side weatherstripping on an older garage door?
Often, yes. However, the installer should check the frame condition, panel clearance, and seal compatibility before choosing the appropriate molding.
Need Help With Garage Door Side Seal Installation in Valley Village?
Noticing gaps around your newly installed garage door? Fixxed Garage Doors can help identify whether the weatherstripping needs adjustment, replacement, or professional fitting.
We provide garage door installation and repair services for homeowners in Valley Village, Studio City, North Hollywood, Burbank, and nearby Los Angeles communities.
Call Fixxed Garage Doors at (323) 364-6764 today to schedule a professional installation assessment or request a Free Estimate. Get the right garage door side seal fit before those small gaps become an everyday frustration.

Recent Comments